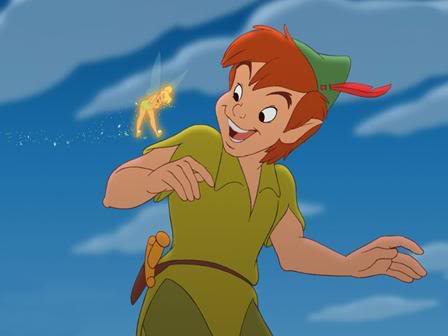
Posted by: Davidreamcatcha | October 20, 2014

Jack Skellington

JACK SKELLINGTON

Jack_Skellington

This Is Halloween

“That’s right…I AM THE PUMPKIN KING!”
***

~~~ A BONY MAN…

In the world of Halloween Town lives Jack Skellington, the King of the Pumpkin Patch. As the patron and leader of that macabre holiday, Jack is responsible for making every Halloween more terrifying and dreadful than the last. After all, no one can scare people like he can, or have quite the artistic zeal in such a responsibility. Yet the Pumpkin King is quite open to new things, to say the least, and this fighting thing looks like fun to Jack. Why, he’s betting that he can improve on this Rumble with some ideas of his own…

~~~ AN BONY BEARING…

Idle Stance
Jack stands tall, arms at his side, eager to see the excitement of this Rumble!

Walk
Jack maintains his pose as he moves elegantly.

Run
Jack hunches slightly as he outstretches his arms, pumping them.

Crouch
Jack’s limbs prevent him from having an effective crouch, instead forcing him into to settle for a mere squat that doesn’t bring him down much at all.

Dizzy
Small Christmas trees and pumpkins float around Jack’s head as he struggles to keep his composure.

Sleep
A small nightcap is drawn in on Jack’s head as he falls to the ground and snores.

~~~ A BONY FORM…

HEIGHT ~ 9
RANGE ~ 8
RUN ~ 8
JUMP ~ 7
TRACTION ~ 6
FALL SPEED ~ 5
POWER ~ 5
WEIGHT ~ 2

Jack may be tall enough to see eye to eye with Ganondorf himself, but he’s not as easy to hit a target as most other large characters, due to being thinner than the columns supporting Luigi’s Mansion. He stands straight and tall when idle, and can maintain the poise of his upper body while walking at any speed. When running and jumping, his outstretched limbs indirectly increase his hitbox size, so sometimes you may want to remain walking to give your foes a harder time trying to lay a hand on Jack. His highest walking speed is just behind his high dash anyway, and his lightness is a frightening hazard for any player to work around.

***

~~~ BONY SPECIALS…

Special ~ Trick or Treat!
Jack conjures a carved pumpkin from his hand, large as a smart bomb, and lets it float in the spot in front of him. Where did it come from, and what keeps it afloat? I’m afraid I can’t tell you that…

These pumpkins float a Pikmin from the ground, and can also be placed anywhere in the sky, smiling their grisly grins at the screen. They’re quite unbudgeable – unless an unlucky foe would be a stagebuilder block near it a few moments after its creation. You see, these pumpkins have quite the desire to smash themselves into careless brawlers and engulf them in a ghastly explosion {15%} not unlike a Bob-omb’s.

Not all’s doom and gloom for the foe, however. Once a pumpkin locks its sights on someone, it’ll float at them menacingly, but slowly, gathering speed as it pursues the foe. But in this state, any attack dealt to the pumpkin with 10% or more damage, even jointed ones, will knock it away like a Primid, making it careen and bounce across and off the stage. Jack’s quite vulnerable should he be hit by his rejected treats, taking the brunt of the explosion, and he can only have two of these out at a time too.

But what’s this? Pressing A during the brief starting lag of this move creates an entirely new pumpkin! They look and act the same, yet instead of a deadly explosion, their collision with anyone creates an outpouring of candy instead, healing anyone for 15% in the same area! My, what a fine treat from ol’ Jack! And if the foe throws these pumpkins away, well, Jack wouldn’t mind reaping that healing instead! Since these are a different sort of pumpkin, this means Jack can have as many as four identical-looking pumpkins grinning their grins around the stage at a time. And as for the foes, they’ll be quite in the dark as to which pumpkins have the treats and which have the tricks…

Forward ~ Ghost of a Chance
Jack holds his hand in front of him, as though holding something – and some ghosts appear in it as a swirling white mist almost as large as Bowser. It seems some other spooks of Halloween Town wanted to join in on the fun, but Jack could only afford for the incorporeal to tag along. This is about to become quite terrifying for everyone else…

Tapping the input makes Jack release this ghost mist as soon as it materializes, and it’ll become invisible as it hovers in the place it was left in. You can hold down the input to make Jack hold onto the mist while able to go moving and jumping wherever. If you tilt in the direction Jack is facing on release, the ghost mist will slowly float forward on release at a speed between crawling and slow walking based on the tilt. Of course, whether it moves or not is disguised by its invisibility.

These ghosts help to boost many of Jack’s attacks to make them even more terrifying, dissipating afterwards. You can only have one of these floating out at a time, the first one disappearing if you release another batch of ghosts of the same kind. What? Oh yes, like your Neutral Special, you can create a “fake” ghost mist of mischievous spirits by pressing A instead of releasing the input. Since you’ll end the move by releasing the ghosts, it may be better to let go of a doppelganger batch if you don’t want to re-place the actual ones. As for what ghosts do exactly, you’ll have to wait for the rest of Jack’s moves, but rest assured that these “fake” ghosts will perform the same effects with none of the damage and knockback. After all, your foes will be quite terrified regardless of whether the ghosts are for real or not, seeing as they won’t know if the ghosts are inching forward or simply lying in wait in the first place.

Up ~ Happy Haunting
Some spirits seem to have come to Jack’s aid – and believe me, there’s plenty of spirits who wouldn’t turn down helping the Pumpkin King. For three seconds after inputting this lagless move, Jack will have near-doubled jumping capabilities and dashing speed thanks to the wispy spirits around his limbs. His best walking speed is still as steady as ever, however.

While in this state, any attack Jack performs that would be improved by his overlapping with a ghost mist with either his body or his limbs is automatically buffed by the helpful spirits! Unfortunately, such an action also removes Jack’s newfound agility, and bars him from calling upon the spirits’ aid for three seconds afterwards. Jack can end up open to counterattack with his recovery removed should he be careless.

Then again, Jack can attack with these spirits while overlapping with an unseen ghost mist as well. The mist will be used up instead, but as a boon, the spirits become invisible, waiting to unexpectedly buff Jack’s next attack on an unsuspecting foe!

Down ~ Graveyard
Jack reaches down into the ground to pull up a…gravestone? How did that get there? It’s a little patch of Halloween Town, really; it even comes with a jagged gothic fence in the background, spreading past the gravestone three stagebuilder blocks on both sides.

Naturally, the gravestone comes with a grave, but an empty one. It won’t appear onstage, instead manifesting as a pitfall trap hidden under the gravestone, and I’m sure you’re all aware what those do. Then again, you can also tilt left or right during the start-up lag to move the location of the trap, concealing it until the foe makes that misstep. The trap can be moved up to three stagebuilder blocks to either side of the grave, so the fence serves as a marker for where it may lie. A wide area to cover for a simple trap, given this, remaining here isn’t a smart defensive choice.

But surely the foe will simply avoid lingering in such a creepy spot, then? Well, perhaps not completely. You see, the homeliness of this dreadful grave makes the ghosts from your Side Special giddy with delight, so much that they become visible when over the spiky fence. Not only that, but the awareness of a pitfall trap below them causes a fake ghost mist to shiver in anticipation of such a scare! These spooks just can’t hide their excitement. On the other hand, a real ghost mist will shiver over a random spot instead, capable of fooling the foe into thinking the real location of the trap a safe place. How well you can manipulate your foes’ fears depends on which mists you use, and will hopefully result in a foe with nowhere to run as Jack approaches their buried bodies…

~~~ A BONY OFFENSIVE…

A ~ Spine Chilling
Jack stretches one of his arms out and begins dancing his fingers over the air in front of him. Oh, Jack, this is hardly the time for such childlike gestures! He can hold it for as long as he wishes, dealing multiple fast flinching hits with his spiderlike movement {1%}. Then again, such a small hitbox can be easily DI’d out of.

With ghost mist overlapping with Jack, the ghosts transform into spectral worms and insects, buzzing under Jack’s fingers. This increases the damage, hits everyone in an Electrode-sized area under Jack’s hand, and lasts for as long as the move is held down. Did I mention this move is particularly chilling if used on a foe’s back? Oh yes, if a foe has their back to Jack, they will be reduced to stunned state akin to Zamus’s Paraylzer after a second of Jack prickling the back of the foe’s neck. And ghosts can help reduce that time to half a second instead…

Forward ~ Bony Grasp
Jack takes a moment to bring his arms back before making a fearsome swipe at the foe with both of his arms {7%}, like a scorpion closing its claws in. Given how long his arms are, this move has quite some range, covering almost a whole Bowser length in front of him. Foes caught are brought right in front of Jack – allowing him to follow up with his Forward Smash, as you’ll see soon enough.

Should Jack overlap with a ghost mist upon execution of this move, large wraithlike claws will appear alongside Jack’s arms to mimic his grasp, pulling in anyone caught {5%} towards his clutches. The size of those claws effectively double the range of this move, but they’re not as dangerous damage-wise as Jack’s hands. On an interesting note, though, anyone the claws push to Jack will end up with their backs turned to him. Hmm…

Up ~ Wave of My Hand
Jack quickly snatches the air above him {9%}, throwing foes upwards at knockback lethal only at around 180%. With ghosts helping out, a ghastly axe swings with Jack’s movement, increasing the range by a Pikmin’s length yet inflicting less damage {5%}.

But supposing the foe’s overlapping with the ghost mist instead, hm? The ghosts will then tag along with the unlucky foe for up to five seconds before dissipating. Should that foe attempt to bring up their shield, the ghosts will be only too happy to scare the foe out of it {8%}, knocking them back into a vulnerable state. Jack can use this to ensure that shield-happy foes are kept in check – or simply fool the foe into not shielding while the ghost mist still waits to come out when least expected.

Down ~ Well-Placed Moan
Jack’s crouch consists of bending his legs enough that his whole upper body stays just above the ground. From here, he can do a quick scare {4%} at people’s feet that slightly flinches anyone standing in front of him. For anyone unfortunate enough to be crouching right next to Jack, though, they’ll be shocked {8%} straight into the air.

The ghost mist won’t help you increase the range, but it does carry a nasty treat for any foes that might be overlapping with it when the move is done. Like the Up Tilt, the ghosts will follow the foe for the next five seconds. This time, after the time is up, they’ll inflict 1% damage for every ¼ second the foe spent airborne through a piercing wail. That should be a fearfully painful enough to dissuade the foe from keeping to the air, and there’s no reason to not feint this move either. You can probably convince the foe to stick to the ground where one can always shield against their fears…

~~~ BONY SMASHES…

Forward ~ With The Slightest Little Effort
This time, it’s no trivial spook coming from Jack Skellington; he prepares a truly blood-curling nightmarish face before unleashing it! Anyone facing Jack on at least two Bowsers away on the same level will be shocked {9%-15%} and stunned for some moments. Anyone directly in front of Jack when he does this will be scared so traumatically that they’ll be sent flying straight up from fear, enough to seal the fate of anyone at 80%-50%! Better yet, one can charge this move while moving slower than the dash, with Jack walking forward at whatever speed he was walking as he secretly charges this frightful finale! And did I mention that it even scares foes out of their shields?

Ah, but let’s not get too excited. Aside from the small sweetspot, the ending lag is nothing less than utterly terrible as Jack will more often than not slouch in disappointment should he not send anyone flying. Even if he does, he’ll spend time taking a good laugh out of his success, so he’s really quite unable to take advantage of any stunned foes. You honestly shouldn’t pull this out until the foe’s well and pitfalled, or sliding into your face thanks to a squashed pumpkin.

Oh, but what about the ghosties? On release, the ghost mists, real and fake, will mimic Jack’s scare from wherever they hovered, also stunning foes on the same level and scaring anyone in the dead center of the mist out of their wits. Yes, the fake one is still harmless, but the real one can help to put an extra hitbox where the foe won’t expect it, keeping them on guard as Jack casually strolls across the stage.

Up ~ King of the Pumpkin Patch
Jack makes a dramatic upwards-grasping motion with his right hand {10%-16%}, a small hitbox capable of knocking out foes at 160%-140%, sending them upwards. This isn’t a very capable KO method, as you’re really better off using your Forward Smash.

So, useless filler? I bet you’ve forgotten about Jack’s Neutral Special then! If any deadly pumpkins dealt damage to a foe in the past 6 seconds, they’ll find themselves with a lingering curse activated by Jack’s Up Smash. A giant spectral skeletal hand will grasp at the foe and hold onto the foe’s body for four seconds plus twice the amount of time Jack spent charging this move. While the foe can mostly attack and move as normal, the hand will slowly drag that foe towards Jack, pushing against their movement.

And as one final boon, the ghost mists will appear as a rising curtain of spirits, reducing float speeds of anyone in the area to 1! They’ll linger for as long as the skeletal hand does, and can be very helpful for juggling foes to their doom.

Down ~ Skeleton Dance
Jack prepares to make three full body spins, arms outstretched. This comes with some good range and damage on each arm spin {2% – 4%}, so Jack can effectively deal with clusters of fighters at once, while punishing anyone who doesn’t DI out. Ghosts overlapping with Jack can augment an individual arm, increasing the hitbox of the hand with a spectral aura the size of an Electrode and boosting the damage to boot {5% – 7%}. Not to mention they make escape via DI much more difficult, allowing you to land a frightening of damage.

One more trick then: does Jack have any pumpkins chasing a foe, Neutral Special or Throw? Then as Jack spins his body, the pumpkin will quickly fly through the background and come back into the fray on the other side of the foe before resuming the chase! Simply imagine a mirror on the foe, and the pumpkin swapping places with its reflection. This can make those momentum-based opponents especially jittery, in case they end up running straight into a pumpkin’s waiting jaws. It’s also useful for fooling mix-ups between the candy and the danger.

~~~ BONY AERIALS…

Neutral ~ Scarecrow
Jack poises like a monster leaping upon its victims, arms outstretched and knees bent. His entire body becomes a lingering hitbox {8%} with this move, lasting a few moments before Jack resumes his normal falling stance. The ghost mist can add some range by closing down as a pair of hungry jaws(7%) on a Bowser-sized area below and in front of Jack. It’s a nasty bite, and both hitboxes do good upwards knockback lethal at 150%.

Forward ~ Arise!
Jack brings his arms down, then moves them up as though gesturing for zombies to rise from their graves. While no such thing happens, anyone struck by the upwards motion {10%} is thrown upwards and likely to lose a life at 160% – if they were on the ground. Airborne foes take much more knockback, dangerous if they’ve received 110% by that point. Ghosts add range much like the Forward Air, turning into an illusory rising swarm of bats {7%} and doing the same upwards knockback.

Back ~ Behind You
Jack quickly reaches behind him; you can’t scare anyone not in front of you, after all. Should he grab someone, he nimbly moves himself behind that foe, fast enough to land an attack of his own once behind the foe. Though he doesn’t stall in the air when using this technique, even when moving behind the foe, there’s almost no landing lag to halt Jack from pulling out another surprise. If you miss though, the ending lag can bite you back, so practice good timing for you scares as always.

Up ~ Skullduggery
Jack pulls out another quick scare by facing up and creating another grimace of terror, complete with clawlike hands. This is enough to spook {6%} anyone straight upwards, particularly knocking out those around 140%. Then again, this move will only hit around the area right above Jack’s head, which we must remember is about as large as a smoke ball. But some nearby mischievous ghosts can magnify Jack’s face with a vision right above his head as long as a battlefield platform, doing the same damage and high knockback. Jack makes quite the character juggler with these upwards-knocking attacks, doesn’t he?

Down ~ Don’t Look Up
Jack lowers one of his hands straight beneath him and makes three tapping gestures below with a bony finger. Back to light creeping harassment, are we? Each tap comes with some frightening damage {3%}, and some good hitstun. With a ghost mist hanging nearby, some spectral hexes magnify the damage (8%). For some added flexibility, you can tilt the arm left or right upon using this move to alter where the hitbox lands. And don’t worry about getting hit by flying foes whose shields have broken; they’ll simply rocket past Jack and out of the stage.

~~~ BONY GRAB…

Grab ~ Skeleton Key
Jack raises his hand above the area in front of him and pinches down with two fingers. I suppose he’d rather not use brute force for his grab, but what surprise does he have in store for the foe then?

Should the grab connect, Jack will hold the foe by their heads with his two fingers like delicate pincers. Given how little strength this appears to show, any foe facing Jack when grabbed will only have half the grab difficulty to mash out of. Not very effective, almost just enough time to use a throw, and don’t all foes face their grabbers?

Not with Jack Skellington, you see. If Jack grabs a foe from behind, such as one pushed towards him by his Forward Tilt, they’ll be facing away from the Pumpkin King, and then it’ll be raw fear of what’s holding them so nimbly by the head holding them down. They’ll have to escape from twice the grab difficulty this time, giving ample time for Jack to enact his pummel.

But first, understand that before Jack throws, he conjures a haunted carved pumpkin larger than a smart bomb to follow the foe from behind as he releases them. These pumpkins don’t resemble those made by his Neutral Special, but they come in all kinds of faces that have no bearing on the throw used. There’s really no damage at all involved; after the time is up, they’ll drop to the ground and disappear. Each pumpkin lasts 6 seconds. Alternatively, Jack hitting the pumpkin himself also destroys it. Aside from that, the pumpkins will relentlessly follow the foe from behind, waiting to enact their ghoulish surprise…

Pummel ~ Pumpkin Swap
Jack still has one throw, however, he has multiple effects avaliable to him on this throw, setting him apart from the not-so-scary participants of the Rumble. The only indication that the pummel has been used is Jack simply tapping his feet in thought, but it causes a whole new effect on the pumpkin – with the only indication to the foe being that animation. The default Pumpkin is Pumpkin A, but each tap will make it Pumpkin B, C, D and so on.

Throws ~ Pumpkin A
While each Pumpkin is following a tagged foe, pressing grab again will have Jack activate it for a different effect. For this throw for example, the pumpkin extends its carved maw to a great size before chomping down on the spot the foe stood on {20%}, dealing upwards knockback lethal at 150% or fully devouring any shield it chomps on. It’s sure to hit – if the foe was standing still or moving slowly. If it misses because the foe was dashing away instead, it’ll fly in pursuit just behind the foe, continuously biting at the air in the event that the foe slows down. After 3 seconds of biting, it’ll finally burn out and drop; it’ll also disappear once it gets one mouthful of the foe. But surely anyone who simply keeps on the move would escape this rabid pumpkin, right? Hopefully, that someone won’t run into any other sinister hazards the way.

Pumpkin B
Upon activation, the pumpkin rushes at the foe and splatters itself on them. That’s…odd. Then your foes find that the pumpkin’s slippery muck not only has coated them, but it has coated their feet as well, changing their traction as though on ice for up to 3 seconds! This can be a most frightening event for when your foe tries to turn around, wherein they end up sliding straight into an open grave. And of course, why not let your foe turn around a few times without activating this to fool them into thinking that this isn’t the shock in store? Then you could make them slide straight into your waiting Forward Smash!

Pumpkin C
With a snap of Jack’s fingers, the pumpkin suddenly grows to an enormous heavy size, large as an Electrode. It’ll also entangle the foe’s feet with its twisting growing stem vine, which is ideal for dragging the foe down as the pumpkin then plummets like Bowser’s Down Special. On landing, the foe can’t move a battlefield platform away from the pumpkin, which will need to have its 15% chipped away to destroy it. Obviously, this is near useless on grounded foes, but can be a nasty surprise for those up in the air, who won’t be able to smash the pumpkin until they’ve landed. And surely no foe would be suicidal enough to jump over a bottomless pit with this pumpkin hovering behind waiting for an opportunity, right?

Pumpkin D
This pumpkin…doesn’t activate. Nope, it just hovers behind for the whole duration, grinning a creepy grin as though it had some trick in store. Your foe is pretty much safe from this kind of pumpkin – so long as they don’t attack, or create any damaging hitboxes. Yes, I can assure you that to anyone who doesn’t attack at all while the pumpkin reads that foe’s every move, the pumpkin will not stretch its jaws to unleash a fiery blaze dealing damage equal to the damage of all the foe’s hitboxes added together. After all, nothing would escape such an attack – not even shields. Those fools who raise their shields would just have the pumpkin burn them to a crisp before unleashing hell upon them…

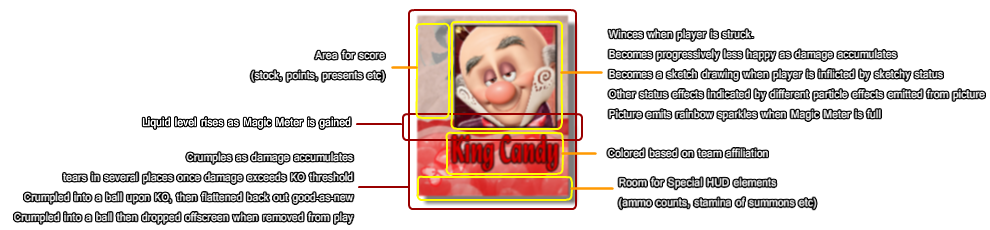
~~~ BONY MAGIC METER…

Magic Meter and other tricks and treats coming soon!!

Posted by: Davidreamcatcha | August 8, 2013

Assist – King Midas

KING MIDAS

Hailing from the 1935 short film, The Golden Touch, Midas is an infamous folklore character – a king who wished for everything he touched to turn to gold. It is this ability that he retains in Disney Rumble as an assist character.

Upon being summoned, it can be seen that Midas is a large and intimidating figure. He’s slightly larger than Bowser, and just as wide. Though his speed is far faster than one would expect from such a portly man, about equal to Fox’s dashing speed. The moment he is summoned, Midas instantly prances about singing an obnoxious song – “The Golden Touch! The Golden Touch!” He dashes around at random across the stage, and has a pair of double jumps to help him reach higher platforms. As he runs along, he turns random foreground and background objects to gold – just a cosmetic effect, yes?

If Midas comes across a fall-through platform (either by running under or running on it), he will press it and turn it to gold. This causes it to fall to the ground a second later with a shattering CLUNK, dealing 12-28% depending on how big it was. If Midas comes across a trap, he will turn it to gold – causing it not to function. If Midas comes across a summon, minion or the like, he will turn them into a gold statue – rendering them useless (and still able to be knocked about).  If Midas comes across a body of water, he will turn it to gold – rendering it solid (this also instantly KOs any character inside it at the time, this effect will not happen on underwater stages). If Midas comes across an item, it will be turned to gold, causing it not to function (but still working as a throwing item).

Should Midas come in contact with a character besides the summoner, he will of course turn them into gold. They can break out at 3x grab difficulty, but can be knocked around during this time. The reign of Midas comes to an end after 20 seconds, or if he is dealt 30% damage during his prancing.  Another 20 seconds after Midas is erased from the field, Goldie the Elf appears in the center of the stage and renders everything he turned to gold back to normal.

Posted by: Davidreamcatcha | February 28, 2013

CHARACTER – Tigger

TIGGER

cliptiggerhappy

The Wonderful Thing About Tiggers

“T-i-Double Guh-r; that spells ‘Tigger!”

***

~~~ A BOUNCY TIGGER…

Tigger: an excitable fellow if there ever was one. Though he was one among many stuffed animals within A. A. Milne’s original book, his personality took on new life in Disney’s Winnie the Pooh franchise. Singing his ubiquitous theme song and ‘bouncing’ all in his path, Tigger charmed audiences everywhere, though not necessarily those on his receiving end. His enthusiasm often leads to chaos, and his confidence is excessive on occasion. Nevertheless, Tigger’s dedication to his friends is second-to-none, and he’ll always plunge forth in his eagerness to help them, disregarding potential risks in the process.

~~~ AN BOUNCY BEARING…

Idle Stance
Tigger stands with his arms at his sides, occasionally taking his tail and spinning it in his hands or lounging back on it on out of boredom.

Walk
Tigger turns to face the screen and begins sidestepping across the stage, as he does during his theme song

Run
Tigger hunches over as he begins to actually run, pumping his arms.

Crouch
Tigger gets down to the ground, tail raised as though ready to jump.

Dizzy
Tigger grasps his head as he shakes back and forth, dizzy.

Sleep
Tigger curls up on the ground, using his tail as a pillow as he begins to sleep.

~~~ A BOUNCY FORM…

JUMP ~ 10
FALL SPEED ~ 7
WEIGHT ~ 6.5
RUN ~ 6
HEIGHT ~ 6
RANGE ~ 5
POWER ~ 5
TRACTION ~ 2

Unsurprisingly, Tigger’s jumping statistic outranks all his others, boosting him far higher than all characters who don’t possess multiple midair jumps. Though he can propel himself with great vigor in one direction, Tigger has trouble stopping any momentum he picks up, being a challenging character to control at times. That said, foes must be wary of the sheer energy with which Tigger can come at them, even if they team up against him.

***

~~~ BOUNCY SPECIALS…

Special ~ Hunny Pot
Tigger reaches behind himself, a simple white-and-brown honeypot is drawn in with half a second of startup lag. Immediately afterward, he throws the pot away from him with great force, making a disgusted face. Tiggers don’t like honey! By default, he throws his honeypot half of Battlefield horizontally, before it falls and splatters on the ground, though he can angle his toss directly up, down, or diagonally, giving the pot a fair deal more airtime before it plummets. Pots create a 2-platform wide patch of honey upon landing, which last for 20 seconds each before vanishing. Foes who land in these will enter as sticky a situation as they do when hit by a honeypot full blast. If dealt 20%, however, pots shatter harmlessly, leaving no trace of honey behind.

Should a character step or fall onto a honey patch, they’ll find themselves adhered to the ground. To escape, they must pull against the honey for a second and a half, jumping up and recovering to stretch away (this becomes more difficult at high damage levels). Speaking of higher damage, knockback that can KO at 100% or lower will also free a victim. A character smacked by a honeypot, however, will suffer 7-8% and become coated in the goopy substance as its container shatters on them. The honey will stick to them, too, for thirty seconds, though it does not inhibit their movement immediately. Coated opponents do experience slight modifications to their grab-game, as well as when they are grabbed; opponents must pull away from the coated character for a second and a half to escape, instead of mashing free, while the coated character must do the same when grabbed themselves.

More significantly, if a coated opponent comes in contact with another character, whether by simply touching them or by hitting them with an attack that KOs higher than 100%, they’ll become stuck together. While adhered, either character can drag the other around, though if their movements are conflicting, the heavier character’s movements will win out, in terms of jumping and dashing (though their jump height and speed are curtailed slightly). Each character can dodge, though they’ll only move themselves into the background, rather than their partner. If either character is attacked, both suffer the knockback, though either character can free themselves using the same techniques that can free characters from honey patches (they can suffer the knockback either from their partner or from an outsider). All of this is, of course, far more difficult to pull off with Tigger bouncing around the premises.

Tigger may have up to four honeypots’ worth of the substance onstage at a time, whether on the stage or an opponent. Bringing out an additional pot causes the oldest honey to vanish. Tigger, while not immune to his own honey, is able to negate its effects with utmost ease.

Forward ~ Scarecrow
Tigger pulls out a simple smiling scarecrow from behind him, forcefully driving its post in front of him over .55 second and brushing his hands together contentedly. The scarecrow itself is as tall as Marth and wide as Wario, resting on a post as tall as Olimar’s body. Two scarecrows can exist onstage at once, each serving as a solid blockade-of-sorts and possessing a relatively sturdy 50 HP. Should Tigger perform this move in midair, his scarecrow will plummet straight down, dealing 7% and spiking foes weakly, before landing onstage. Scarecrows’ posts knock foes up into the air should they become caught underneath as Tigger plunges downward, dealing 7% and putting them in a prime position for Tigger to deal with using the rest of his moveset.

Most importantly, however, is Tigger’s use of scarecrows as a surface for his Up Special bouncing. Though Tigger generally prefers facing multiple opponents to spring from, by planting scarecrows against a single opponent, he retains humanoid figures to aid him in his bouncing, allowing him to lunge at opponents from all sorts of new angles at his leisure. If an opponent is hit into a scarecrow, they’ll bounce from it as they would from any old wall (though scarecrows cannot be teched). If Tigger pegs one with a honeypot and coats it, however (or coats the opponent), they’ll stick to the scarecrow, having to pull away from it to escape. This can come in particularly handy if Tigger plants a scarecrow over the stage edge, where foes will have to jump over it at the very least to begin with.

Up ~ Whoopty-Dooper-Loopty-Looper-Alley-Ooper Bounce
Tigger freezes in place, lifting a leg and twisting his middle around multiple times like a coil. He may hold this animation for as long as he pleases, angling it with the control stick or canceling out of it by shielding. He may also perform the move in midair, though he falls shortly after initiating it, much like Fox’s shine. Upon release, Tigger soars, arms outstretched, in a “super bounce” half of Final Destination in the selected direction, or vertically if none is chosen.

Should he come in contact with an opponent, he’ll circle comically around them, both remaining airborne while he spins between the foreground and background. From there, the Tigger player can tap A and a direction to perform a second aimed “super bounce” off of them, dealing 10% in the process. This second bounce is not only free of startup lag, it propels Tigger’s victim in the opposite direction, spinning helplessly as if footstool jumped (even if they’re not bounced downward). Tigger can circle a foe as long as he pleases before bouncing off them, though because characters can attack him out of this state, he had best aim his bounce quickly. Tigger can “super bounce” between opponents an infinite number of times, canceling out of the move by dodging if necessary, though he may not wish to do so, as he’d lose all the momentum he gained through his maneuvers.

Tigger initially soars at Fox’s dash speed half of Final Destination before stopping (if no character is in his path), though both stats increase by half with each subsequent bounce, up to twice this speed and distance after four bounces. More importantly, the time an opponent remains in their footstooled state is increased by half with each subsequent bounce, again maxing out after four bounces; the speed at which they travel while foostooled is also increased slightly. Tigger isn’t limited to bouncing between multiple opponents either; he can also bounce off of scarecrows to increase momentum (try placing two close together for maximum efficiency), off of the ground or walls (which he will press up against during his angling phase, rather than circling around), and can even bounce off of an aerial honeypot he’s thrown, though the damage he deals upon bouncing off may shatter them. To break his momentum, opponents will either have to time an air dodge or attack Tigger out of his flight, though the latter option becomes more difficult as he reaches higher speeds.

Depending on how opponents, scarecrows and honeypots are positioned, either through Tigger’s own planning or organically, Tigger can build up this bouncy momentum quickly. Even if he’s not prepared to footstool foes into a gimp to finish them off, the increasingly troublesome stun Tigger inflicts on opponents after each bounce allows him to return to them with an additional bounce, continually pushing them in one direction before potentially finishing them off with an aerial. There’s always the option to push the opponent down into a patch of honey as well. And, should Tigger ever become stuck in honey himself, he can launch himself free with little to no effort with this mult-purpose centerpiece.

Down ~ Hop-penstance
Tigger jumps up slightly and starts springing up and down in place on his tail, charging his energy. Upon release, Tigger begins bouncing up and down in place, at a rate of one bounce per second, reaching a height of 1.5 Ganondorf at each bounce’s apex. As you might expect, Tigger’s charge modifies the height of his bouncing, but rather than setting all bounces to one set height, charging increases the rate at which he bounces higher and higher. Merely tapping the input will cause Tigger to bounce without gaining any height. Holding the charge for half a second causes him to increase the height of each successive bounce by half, while charging a second or longer results in him doubling the height of each successive bounce. Naturally, higher jumps take longer to land from, so the Tigger player can fastfall to return to the stage before reaching his bounce’s apex (or to fall more rapidly once reaching it), and can cancel the stance entirely by hitting the input again, likely to prevent Tigger from bouncing -too- unnecessarily high.

Regardless of bounce height, Tigger essentially enters a state of automatic short-hopping, able to DI around before landing from each bounce. This comes in handy during Tigger’s approaches, allowing him to begin a move on the ground and continue while traveling into the air to pressure foes around the stage. In addition, short-hopping around the stage freely is an excellent way to aim the trajectory of thrown honeypots, both in terms of height and distance traveled. And once Tigger has grabbed a honey-coated foe, bouncing around the stage or into the air to position them is yet another invaluable tactic he may enjoy, since he doesn’t stop onstage once they’re in his grasp.

~~~ A BOUNCY OFFENSIVE…

A ~ Kick Back
Tigger bounces onto his tail, aiming his feet forward as he kicks lightly forward multiple times rapidly, laughing ‘hoo hoo hoo hoo’ as he does so. He may hold this move out for up to seven seconds, with him performing approximately two kicks per second. Each kick deals just 1%, pushing foes back a set platform distance. While this is obviously quite useless for racking damage initially, should he manage to connect with a honey-coated opponent, they’ll become adhered to his foot. In this case, the foe will bounce back the set distance, before snapping back to Tigger, allowing for a bit of situational damage-racking. In midair, where this is less plausible, Tigger’s kicking can still serve as a decent spacing move; since he’s already on his tail due to being in his Down Special stance, the move’s slight startup lag is negated, much to Tigger’s benefit. Because of this, if Tigger ever needs a single quick move with which to KO an opponent close to a blast zone, this is often his best bet.

Forward ~ Tail Lasso
Tigger casts his tail out in front of him over .4 second, with it enlarging slightly so that, when he holds its end, it forms a loop. He holds the lasso out for a slightly shorter period of time than Link’s grab, with his tail having a miniscule hitbox all the while. Though this merely deals 3-4%, the minimal push it gives opponents can still prove advantageous to Tigger. Should opponents hit the portion of the lasso closest to Tigger, it will stun them directly in front of him, setting them up perfectly for a grab, among other moves. Should they hit its outer portion, on the other hand, they’ll be spaced away just enough to be effectively pegged with a honeypot (and stunned so they cannot defend against it). In midair, these spacing maneuvers come in most handy for positioning foes to be bounced off of with Up Special.

Up ~ Header
Tigger leans down slightly before thrusting his head into the air, his vertical range extended slightly by his tail. By default, the move deals 6% and knockback KOing around 200%. Onstage, it’s more of a juggler than anything. However, should a character fall or fastfall onto his head’s hitbox, these two outputs increase quite a bit. After all, Tigger’s top is made out of rubber.

For every Marth an opponent falls, the damage is increased by half, while its KO percentage is lowered by 15%. Fastfalling has an impact on the amount of damage and knockback characters receive, though the extent of this impact depends on the character in question’s individual fall speed. Tigger can also take advantage of these buffs by bouncing up with Down Special and executing U-Tilt before he begins to fall. This comes in particularly handy when attempting to boost multiple glued opponents into the air at once, since their combined fall speeds guarantee a higher payoff, at least damage-wise (if all foes involved are too heavy to launch much).

Down ~ Stomp
Tigger hops forward and stomps the ground with both feet over .7 second. His feet contain a pitfalling hitbox (with less effectiveness), dealing 5-6% in the process. Should Tigger connect with the move, the player can tap A twice more during the brief ending lag for Tigger to stomp in place over his victim, increasing the difficulty with which they can mash free slightly while dealing additional damage. Opponents stomped into a patch of honey face twice the regular mashing difficulty to begin with, so Tigger can potentially keep his foes as viable stationary bouncing targets for quite some time, since foes in honey patches must still pull free once leaving their pitfall.

If Tigger stomps on foes glued together with honey, he won’t pitfall them, but will rather separate each character, dealing 5-6% each and pushing them back a short distance from each other, stunned slightly. This grants him smaller, more plentiful bouncing targets, spacing them nicely apart so that he may spring between them with Up Special to boot. Used in midair through Down Special, Tigger will perform a stall-then-fall at a slight diagonal angle, pitfalling foes with more force than usual before springing skyward again (albeit at an angle that makes it awkward for him to repeat the move on the same victim).

~~~ BOUNCY SMASHES…

Forward ~ Pounce
Tigger gets down on all fours, snarling comically, before pouncing forward a platform. He’ll suffer moderate end lag if he fails to grab an opponent. If he connects, however, he’ll begin rolling over and over with them, traveling forward across the stage from two platforms to half of Final Destination, depending on charge time. Opponents suffer 15-21% from multiple hits as they roll, ending in prone as Tigger stands overtop them, ready to capitalize on their next move. They can mash A to free themselves from Tigger’s pounce if they’re not coated in honey.

If they are, not only are they stuck with Tigger, but they help him out mid-roll; while rolling across the stage with a coated opponent, Tigger scrapes the honey off their body and onto the stage, creating a patch as long as the distance he traveled. Conversely, if Tigger rolls a regular opponent through an existing honey patch, he’ll transfer the substance from the stage onto their body, removing the trap but inflicting them with the status effect. Regardless of honey, Tigger can also roll right off the stage with an opponent, setting them up for a gimp or giving him additional time to toss honeypots around. If Tigger uses this move on multiple glued opponents, he’ll remove the honey keeping them stuck together, dropping each character periodically into prone until he’s ultimately standing over just one at the end of his roll. Though this requires Tigger to keep track of multiple characters’ get-up strategies at once, it’s yet another option if he wishes to space out opponents for bouncing purposes.

Up ~ Hugging Hurl
Tigger compresses his tail down into the stage, looking determinedly upward. Upon release, he bounds from one to two Ganondorfs into the air, arms spread wide. Should he connect with a victim, he’ll cling to them, performing three rapid flips in midair before flinging them skyward, dealing 12-16% and knockback KOing from 220-205%. The player can alter the trajectory of Tigger’s victim with the control stick while he’s flipping. After being launched, Tigger’s opponent remains in a dizzied state of histun, falling anywhere from 0.75 to 1.25 second before gaining mobility.

This won’t do much to gimp most characters offstage, but it does create a nice temporarily-immobilized bouncing target for Tigger. In addition, he can grab honeypots he’s thrown, flipping their contents into the air to fling them around in the form of the honey blobs from D-Smash. This time, however, eight blobs are sent to either side, traveling in a fan shape to either side of Tigger; these are quite effective in peppering foes with 3% hits that whittle down their aerial movement. Barring aerial platforms, these aerial blobs will not land and create patches; a mixture of D-Smash and U-Smash to position and bog down opponents is preferable by far in this regard.

Down ~ Tornado Tail
Tigger spreads his arms, stands on a single foot and begins spinning around in place rapidly, his tail spinning freely with him. It reaches out approximately three-quarters of a platform around him, dealing multiple hits of 2-3% that can total from 22-28%, depending on charge. Though characters are generally hit outward after three to four hits, an individual coated in honey will remain caught in the multiple hits, racking up damage rapidly.

Should Tigger use this move overtop a patch of honey, he’ll fling the platform’s worth of honey he’s on horizontally to either side, in the form of four Pokeball-sized blobs each way. Though, unlike regular thrown pots, these blobs won’t coat opponents, they will deal 3% and decrease their aerial mobility by one statistical unit, preventing them from cruising through the air effectively to avoid honey patches below. Blobs travel in a Ganondorf-high arc two platforms away from Tigger, each creating a mini-patch as large as one character width. Rather than tossing out multiple pots to create patches, Tigger can instead create a single patch, then spread it around to generate multiple ones, all spaced out for maximum sticky chaos.

~~~ BOUNCY AERIALS…

Neutral ~ King of Swing
Tigger faces the screen and stretches his arms and legs out for a half second. If he comes in contact with a foe during this time, he’ll begin swinging around with them in an increasingly-rapid circular formation (he reaches maximum speed after one second). Much like with his spinning from Up Special, Tigger is able to hold this pose infinitely, though his victim may attack him away after the initial stun they suffer from being grabbed. Upon release, Tigger will use his momentum not to fling himself away, but to hurl the opponent in any direction instead. They suffer 7-11% from being thrown and are sent back with slightly more or less distance depending on charge time. Honey-coated opponents require more momentum to throw longer distances, due to their stickiness.

This move comes in most handy when you consider that Tigger can perform aerials while soaring around with Up Special, performing the move while continuing in his trajectory, before returning to his default soaring state. In this case, he’ll throw his opponent, pausing half a second before soaring after them with Up Special automatically, his momentum retained. This is an excellent on-the-fly spacing technique, though Tigger’s slight end lag before soaring again prevents him from infiniting victims. As a last ditch option for keeping honeypots airborne or changing their flight path, Tigger can fling them as well, though he risks shattering them prematurely in doing so.

Forward ~ Lunge
In an unusual startup for an F-Air, Tigger rears back slightly, as if preparing to pounce. He may hold this pose for up to a second before pouncing, though he does not power up his subsequent attack at all by doing so. If Tigger just pounces regularly (or if a foe automatically triggers his pounce by touching him during his startup), he’ll travel forward a platform, dealing two hits of 5% to his opponent, first colliding with them, then kicking them forward lightly enough to not have any real KO potential, but strong enough to push them away, even if they’re coated in honey.

When used out of his soaring Up Special stance, the startup becomes a valuable tool with which Tigger can throw off opponents trying to do the same to him. If they try air dodging so that he soars past them, Tigger can simply pause, wait for the opponent to re-enter the foreground, then pounce onto them, circling around them in this instance rather than hitting them away. This is not a flawless option, however, as Tigger will lose his soaring momentum if he pauses for longer than .5 second before pouncing.

Back ~ Spring Bottom
Tigger leans back slightly, thrusting his tail behind him in the hopes of connecting with a target. He’ll suffer from a split second of ending lag should he fail to find one, but if he does, Tigger will prove exactly how springy his bottom can be. He’ll press into them for a split second, before propelling himself forward half of Final Destination and his victim back the same distance, dealing 5-6% in the process. Both these distances are halved if the foe is honey-coated.

While compressed against an opponent, Tigger may angle his trajectory diagonally up or down. This is one move Tigger ought not to use while building momentum, since it will slow his soaring down by half. However, if he successfully launches from an opponent, he can use Up Special within a second after doing so to start soaring with momentum equivalent to that he has after bouncing off one foe. If Tigger’s foes are squeamish and difficult to manage, Tigger can build up a little early momentum by using this off of a scarecrow for starters.

Up ~ Constrict
Tigger undergoes rather different animations for this move when he’s soaring or in his default aerial state, though both serve the same ultimate purpose. In his default state, Tigger merely reaches a Mario skyward, aiming for his victim’s heels. Should he connect, he’ll cling to them, dealing no damage but effectively grabbing them and combining their fall speeds. Foes can mash free (this becomes twice as difficult if they’re honey-coated) or attack Tigger to escape, though he can dodge free if he chooses to do so early.

Should Tigger perform this move immediately before soaring into an opponent, he’ll constrict around them from his circling state. Now that he’s no longer spinning madly, he and his victim will begin falling freely. In addition to dodging, Tigger may also cancel out of this fall by soaring off his opponent, retaining his momentum as long as he bounces off within a second and a half of initiating the move. Falling with his victim allows Tigger to aim his subsequent bounce more accurately, as well as to potentially drop a victim into a honey patch.

Down ~ Tail Drag
Tigger extends his tail a Mario downward, forming a slight hook with it to snare opponents. Rather than immediately bouncing off them, he’ll loop his tail around any character he hits, capturing them in a grab-like state from which opponents can escape by attacking or mashing (again, more difficult to mash free from for honey-coated opponents). From this position, Tigger may input the move again to bounce his opponent down after falling a short distance, angling their trajectory slightly left or right if he so chooses. This deals a rather average 8% and knockback that can spike opponents with a fair amount of damage.

Tigger uses this move identically while soaring around, with its key difference being that, once he uses Up Special off his snared victim, he’ll drag them along with him, hooked with his tail. Now, he may either spike them at any point while soaring (perhaps over a specific honey patch), or continue dragging them along while circling around other opponents. In this case, Tigger’s first victim will slam into his second one as he springs from them, dealing an additional 5% to them along with the damaging footstool they’re already receiving. The time Tigger has to drag around a victim depends on the momentum he already has, as well as the victim in question (whether or not they’re honey-coated, how heavy they are, etc.).

~~~ BOUNCY GRAB…

Grab ~ Marvelous Chap
Tigger simply reaches forward with moderate range and speed, holding his foe in a noogie pose of sorts. His highly mobile grab-game becomes automatically more effective on opponents coated in honey, who must pull against Tigger for 0.75 second (half the time of escaping from a honey patch) to escape rather than mashing; as Tigger moves around, his opponent will have to alter the direction they’re pulling at a moment’s notice. When Tigger grabs multiple opponents glued together with honey, this becomes even more challenging, as the opponents must coordinate their efforts to pull free, rather than pulling willy-nilly in multiple directions. Tigger is capable of grabbing in midair while short-hopping with Down Special, enabling him to handle aerial opponents his own special way.

By using a pummel, Tigger will spin a foe around in his arms rapidly, dealing 1-2% and a light stun so as to delay their escape. When grasping multiple opponents, however, Tigger spins the opponents to shift his grasp from the one opponent of two or three he’s grabbing to another, allowing them to bear the brunt of his upcoming throw instead.

Throw ~ A Toss-Up
Tigger spins around once before tossing his victim into the chosen direction, dealing a light 3% in the process. Onstage, this create a simple set-up with which Tigger can build momentum vertically, through using Up Special to bounce between the foe above him and the stage beneath him. If Tigger has managed to use a combination of Down Special’s bounces and the stunning properties of his grab-game to get close to the top blast zone with his opponent, however, he can simply toss them up, before springing down toward the stage with Up Special to push them up into a Star KO in a footstooled state.

This is nigh impossible to pull off when carrying multiple glued opponents, whose weight affects Tigger’s jump height. Instead, when Tigger releases them, they begin falling freely, becoming able to use gravity to pull free from each other easily. However, if Tigger releases these opponents offstage, the diverse nature of each character’s recovery may directly screw them all over; while some characters are attempting to pull free and reach the stage vertically, others are performing horizontal dashes or levitating freely to do so. As a result, all characters may end up glued together until the bitter end, granting Tigger a triple KO as a result. Even if a character or two manages to escape, the opportunistic bastards among them may simply finish off the remaining glued victims on their own, working in a way that benefits Tigger without him even intervening.

~~~ BOUNCY MAGIC METER…

MAGIC BLITZ ATTACK ~ EXPERT CLIMBING
Tigger laughs his trademark ‘hoo hoo hoo hoo’ as a monstrous tree sprouts from the center of the stage, rapidly sprouting far, far up and beyond the top blast zone. This particular tree is riddled with branches, each two platforms long, solid, and on alternating sides of the tree. Each branch is spaced 2 and a half Ganondorfs from the next branch; in other words, it’s a perfect opportunity for its user to show off that no one can climb up trees like Tiggers! Tigger automatically bounds onto the first branch, beginning the Final Smash.

Over the next ten seconds, the screen scrolls up at a fast rate, comparable to the maximum speed on The DK Jungle Beat stage. Of course, this is no real problem for Tigger, who can use his bouncing prowess to navigate the branch platforms with utmost ease. However, the vast majority of his opponents must double jump and recover, just to make it to the next branch and avoid being KOed off the bottom of the screen. Tigger can either waylay opponents with his various spikes or stunners (honey patches are devilish here), or bounce off the screen top, causing the screen to scroll even faster to keep up with him.

After ten seconds, the screen reaches the tree top, giving characters a second’s rest before scrolling all the way back down to the stage over the same time frame. Opponents have a far easier time surviving this phase of the Final Smash, since Tigger cannot fall down to speed up the scrolling, though they can now be KOed off either the top or bottom blast zone. Should Tigger slip up and fall, the screen will simply return to the stage, causing all foes to fall back down harmlessly as the tree vanishes. If Tigger can keep ahead of the scrolling, this can be a highly potent finishing move against sluggish opponents, though against more nimble ones, he may have to intervene more to score an actual KO.

MAGIC BLAST ATTACK ~ LEMME AT ‘EM!
The screen zooms in on Tigger as he cries the move title, leaping forward in a bound that takes him 3 BFPs forward. If he connects with someone, you successfully use your magic meter attack as Tigger begins pummeling his foe and begins doing a variety of comedic things to them, such as slapping them across the face with his tail and getting them in a Gaston-esque dust cloud. This exchange lasts 5 seconds and deals 40% damage to the foe. At the end of this, Tigger is left dribbling his foe in ball form on the ground, a state which they can escape from at 2x grab difficulty. By tilting in a direction, Tigger throws them as they unfold, leaving little room to recover. This is a better KO method when dealing with agile foes, though is unfortunately only able to be used on one foe at a time (though a flying ball form foe can deal 16% to opponents they fly into, knocking them both in opposite directions)

***

~~~ BOUNCY STYLE…
Much as he does into his source material, Tigger inserts a well-needed shot of adrenaline into matches. Whether he’s ricocheting through the skies at top speeds or springing around onstage, Tigger is constantly on the move throughout his matches. His preference for handling multiple opponents, whether in a FFA or team setting, becomes apparent when his winning strategies are evaluated. Regardless of the number of foes Tigger is pitting against, his curious lack of emphasis on traditional knockback gives the impression of him being a whimpering weakling. However, Tigger is anything but a paper tiger at the end of the day.

Tigger’s gameplay from the start of each match will generally revolve around his honeypots. Through a combination of careful aiming and spacing through Down Special, Tigger can coat both portions of stage and opponents with the substace, bouncing annoyingly out of reach all the while. Against single opponents, Tigger is better off sealing them onto the stage to form a stationary target, while, against multiple opponents, coating at least one opponent in honey before baiting or knocking them into a second or third character creates a mass of hurtboxes, easy to manipulate.

Simultaneously or immediately after this, Tigger can commence racking damage on opponents. Rather than simply charging headfirst into the fray, Tigger’s bouncy mobility enables him to spring forward or backward at will with Down Special, initiating moves at opportune moments to counter enemies during their moments of vulnerability. He can continue with this tactic against aerial opponents, bouncing progressively higher to their level to chip away at them, fastfalling back to safety when necessary. Other damage-racking tricks up Tigger’s sleeve involve abusing a honey-coated opponent with multi-hitting standards or absorbing their blows with a scarecrow before retaliating. Regardless of how much damage Tigger builds up, he won’t be knocking opponents around anytime soon, though a damaged opponent is still plenty vulnerable against him when Up Special comes into play.

Eager to show off his prized technique, Tigger’s Up Special factors heavily into his strategies for building the momentum required to propel opponents around the stage. The more damage an opponent has, the further and faster they are ‘footstooled’ helplessly through the air and potentially even to their doom. A fair chunk of his moveset creates strong set-ups that allow him to initiate Up Special soaring momentum, beyond the clear option of bouncing between two scarecrows. Throw, for example, lets Tigger bounce between his aerial victim and the stage, while D-Tilt can push two foes apart so that he may do the same horizontally. More subtle attacks hamper foes’ mobility so that Tigger can aim for them within a more finite range; the honey droplets from D-Smash and U-Smash, as well as the latter’s dizzy effect, showcase this perfectly. Even against reluctant or slippery opponents, Tigger’s aerials grant him an extra few direct positioning options, such as N-Air’s fling, U-Air’s dropping and D-Air’s dragging; even against single foes, the chance to bring them closer to a scarecrow or the stage helps Tigger take advantage of each and every surface available to him as much as possible.

Ultimately, the forceful foostool Tigger’s soaring momentum generates will ideally have multiple foes fighting to recover offstage at the same time Gluing foes together can prove beneficial in this pursuit, as can foostooling one foe into another, resulting in both being knocked back (as occurs with regular knockback). Beyond simply allowing his opponents to self-destruct, Tigger can ensure their doom either directly or indirectly, bouncing out himself to finish them off with a D-Air, or perhaps playing it safe and planting a scarecrow on the edge or coating it with sticky honey. If a glued mass of opponents near the edge, Tigger can also use his grab-game to disorient them, immediately before casting them over it. When all else fails and opponents are somehow able to recover, Tigger can coat foes in honey, grab them, and repeatedly bounce with Down Special toward the screentop so that KOs off the blast zone become feasible.

Tigger’s ability to adapt to any number of opponents gives him a certain degree of well-roundedness as a character. The sheer energy he brings to matches will prove tricky to manage at first, and, when managed poorly, is not substantial when faced with enemy assaults. Once properly harnessed, however, matches with Tigger become legitimately momentous experiences. Much like Tigger’s own personlity, his gameplay revolves around single-minded determination toward a task, but with whimsical creativity strewn playfully into the mix. Hoo hoo hoo hoo indeed.

***

~~~ A BOUNCY PERSONALITY…

Up Taunt
Tigger bounces around in place, singing two verses of his theme song with each input of the taunt; slight musical accompaniment plays in the background as he does so, though it does not override the main stage music.

Forward Taunt
Tigger strikes the charging pose from his song, tilts his head into the air and laughs: ‘hoo hoo hoo hoo!’

Down Taunt
Tigger jumps up briefly, then gets on all fours and snarls at opponents. A very basic taunt, unless performed into a mirror, upon which Tigger’s own reflection will frighten him and cause him to jump into the air in shock as an additional part of the taunt.

Victory Pose 1
Tigger performs two bounces, before performing a front flip on the third and landing on his posterior.

Victory Pose 2
Tigger struts around the victory screen, calling out, “T-i-Double Guh-r; that spells ‘Tigger!'” to anyone listening.

Victory Pose 3
Tigger compresses his tail down briefly, before springing clear off the screen top. He does not fall back down immediately, and instead peeks down, dangling from above. It seems as though he’s taken a page from the book of the dreaded ‘jagular.’

Losing Pose
Tigger claps, his lower lip trembling slightly as he struggles to accept his loss, eventually slumping on the ground. Quite a departure from his regular upbeat personality…perhaps the promise of future bouncing will perk him up again?

Shield
Tigger cowers behind his tail, which becomes solid as he brings it up for the duration, whimpering to himself.

~~~ A BOUNCY REPUTATION…

HADES/ Whoah, geez! Slow down, kid! Heh. This one looks he got waaayyy too much caffeine this morning!

~~~ A BOUNCY TALE…

Symbol
A Hunny Pot, which is the main icon for the Pooh series as a whole.

Entrance
Tigger soars onto the stage, using his Whoopty-Dooper-Loopty-Looper-Alley-Ooper Bounce, before declaring, “Hello! I’m Tigger!”

Selection Sound
“Hoo hoo hoo hoooo!”

Music
Really now? As if Tigger would ever have anything but a clip from his iconic song as his victory theme.

***

T-T-F-N! Ta-Ta For Now!

Posted by: Davidreamcatcha | February 26, 2013

CHARACTER – Peter Pan

PETER PAN
peterpan

You Can Fly

Just think happy thoughts…

***

~~~ A MAGICAL BOY…

Peter Pan flew away from home when he was a baby, when he heard his parents discussing what he was to be when he became a man. Horrified at the thought of ever growing up, Peter ran away to Neverland, a place where children never age and retain their youthful traits forever. Peter’s closest friend is Tinker Bell, a common fairy who is very protective of him and can be rather rude; Peter is the only one who can understand her. He’s also the leader of the Lost Boys, a group of young boys who have come to Neverland without any parents. Peter is the bravest of the Lost Boys and more than others in general due to his youthful ignorance.

Peter Pan’s most famous story came through his titular movie, in which Peter and the three Darling children—Wendy, John, and Michael—fly to Neverland and Wendy tries to be a mother to Peter and the Lost Boys. Eventually they are apprehended by his arch nemesis, Captain Hook, who kidnaps the Lost Boys and the Darlings and tries to bomb Peter. Tinker Bell is nearly killed by the explosion, leaving Peter to care for her. After saving Tinker Bell, Peter confronts Hook on his ship and defeats him once more, sending him into the waiting mouth of the croc. Peter, Wendy, Michael, and John all flew back to London, leaving the Darling children with their parents. He went back to Neverland, ready to have more magical adventures.

~~~ A MAGICAL BEARING…

Idle Stance
Peter impatiently looks about, tapping his foot if he begins standing still for too long. Occasionally Tinker Bell flies around his head and he follows her with his eyes.

Walk
Peter walks rather awkwardly, swinging his arms. Normal walk, nothing too special.

Run
Peter pumps his fists and begins to dash forward, hunched over slightly. He’s clearly trying to make himself go as fast as possible. It’s not a competition, Peter!

Crouch
Peter bends his knees outward, balancing on the balls of his feet. His arms rest on his knees, hands folded.

Dizzy
Peter clutches the top of his head and shakes his head, staggering about. Tink flies around him, poking and prodding the boy in an attempt to snap him out of it.

Asleep
Peter lies prone on the ground, arms and legs sprawled out lazily. He snores softly, and Tinker Bell rests peacefully on his chest.

Hover
Peter floats above the ground; one leg is slightly bent while the other is extended downwards. He normally keeps this pose throughout his movements, although he still has idle animations such as scratching his head or playing with Tink.

Flying
If slowly flying, Peter moves in a manner similar to Hover Mode. If flying forward at full speed (tap the control stick), Peter’s legs are extended straight back and together, and his arms are held back at an angle. If flying up, Peter’s hands are held by his sides as he shoots upward.

~~~ A MAGICAL FORM…

RECOVERY ~ 10
GROUND SPEED ~ 6
AIR SPEED ~ 7
RANGE ~ 4
POWER ~ 3
WEIGHT ~ 2
TRACTION ~ 2

Essentially, Peter is a typical lightweight fast-hitter. His attacks are weak, as most of them either involve his small dagger, or a fairy dust and/or stardust, which isn’t exactly powerful either. His speed on the ground is average due to him being an average boy, but his flight speed is what makes it easy for him to dance around opponents’ attacks and give him great maneuverability. Due to his small weapon and general lack of projectiles, Peter’s range is slightly subpar, forcing him to get close to opponents to do lots of damage.

Obviously, Peter’s recovery is one of the best in the game due to the fact it lasts indefinitely and he can easily recover from the bottom of the stage and even fly around it. Of course, get hit once and chances are you’re out of luck. Traction is also a problem for Peter, making him easily knocked around even while on the ground.

~~~ A MAGICAL MECHANIC…

Peter Pan is most famous for his renowned aerial abilities, and this shows in his moveset. In his fights, Peter actually spends more time in the air then on the ground. If you press the jump button, Peter enters Hover Mode, in which he moves horizontally above the ground (about a half of a stage builder block in height) with a steady pose, Tinker Bell floating behind him. In this state, Peter moves approximately 1.5x faster than normal running speed, and knockback taken is increased by 50%. His falling speed is also reduced by half. In addition, he cannot use his Down Tilt or Down Smash; if you do use these moves, he returns to the ground. His grab cannot be used due to Peter’s lack of strength and no ground to provide traction. If you wish to return to the ground without attacking, simply hold down on the control stick.

However, Hover Mode is merely (or usually) the transition stage. By pressing the jump button a second time, Tinker Bell releases pixie dust all over Peter and he is surrounded by a bright, momentary glow. A small bell chimes as this occurs, and Peter enters his signature Flying Mode! This state acts remarkably similar to Pit’s Icarus Wings move, in that Peter can move freely about the stage, only that he takes on more animate poses; for instance, actually faces the direction he’s going and alters his body pose depending on whether or not you’re zooming at full speed or just leisurely floating along.

♦ TIP!!! You can perform a fancy loop by quickly circling the control stick. This allows Peter to dodge attacks, although it can only move him forward—if you rotate the control stick backwards, Peter will flip backwards, but will not move in any direction.

Of course, this will obviously change the properties of Peter’s aerials—if his aerials existed. That’s right; all of Peter’s aerials are merely transplantations of Peter’s standard attacks, just…in the air. Peter can truly treat the air as if it were never there, making him possibly the most formidable aerial foe in the roster. This means his can use his Down Tilt and Smash, although they are slightly modified due to the fact that there is no ground. In addition, his Up Special does not grant him a recovery; this is to balance his already incredible aerial prowess. Similar to Hover Mode, Peter cannot use throws. If you try to grab, he merely spot dodges.

Now, with all these benefits Peter gets while flying, you may wonder, “Why would I ever want to stay on the ground?” It’s a common question when new players try to play Peter Pan; they get carried away with flying and don’t realize the disadvantages he has while airborne.

First off, knockback inflicted to Peter is increased almost threefold while in the air. Combined with his already light weight, Peter can sometimes be KO’ed before even reaching 100% damage! This means it is imperative that you not just rush the opponent mindlessly, but make sure you know when to retreat. Peter’s hamartia has always been pride, and don’t let it be yours, too.

Second, since Peter’s Up Special does not grant him extra recovery, you must make do with what you already have. If Peter is struck while in flying mode, he will begin freefalling; however, you can call upon Tinker Bell again and return to Flying Mode by holding the jump button. Unfortunately, the more damage you take, the more likely it is that Tinker Bell will be too weak to help you and Peter will plummet to his imminent doom.

Third, you can’t just stay airborne infinitely. If you Peter merely floats idly in the air for more than three seconds, he begins to sink towards the ground, as Tinker Bell can’t keep him flying unless he keeps moving. If you fly too high towards the top of the stage’s boundaries, Peter can usually only last about a second of staying still before falling; the same occurs if he goes too far towards the bottom of the stage’s boundaries. This prevents players from merely floating just out of reach of their opponent’s attacks and stalling until time runs out.

***

~~~ MAGICAL SPECIALS…

Neutral ~ Wayward Fairy
Peter doesn’t do anything for this move; instead, it’s Tinker Bell who does all the work. She flies out from behind Peter and quickly goes forward one stage builder block, sprinkling pixie dust along the way. Unfortunately for the opponent, the pixie dust Tink produces during this move is rather…volatile, shall we say. It grants opponents the ability to fly, but they have no means of controlling it.

Essentially, the opponents are sent flying back one stage builder block and up the height of its bottom platforms. The trajectory of this move is curved, and the opponent cannot move while flying. At first glance, this move may seem to be a wonderful KO move, but due to the fact that the knockback is always the same regardless of damage, it doesn’t actually serve much of a purpose other than keeping your opponents away from you. Please note that this move does not work on  bosses/summons.

Up ~ Pan Pipes
Peter Pan’s Pipes are drawn-in as Peter starts playing the recognizable melody from the song “Following the Leader.” The animation lasts up to four seconds depending on how long you hold this out, though it has some “meh” end lag if you exit this time. During this time musical notes appear around Peter, floating lazily in all directions the distance of one stage builder block. These notes come in two colors: red and blue. The red notes cause about 4% damage and stun the opponent slightly, as if they had been hit by Falco’s laser. The blue notes send opponents to sleep, the length of the sleep depending on the damage the opponent has.

This move is fun, but unfortunately, the notes move a little too slowly to be useful in any situation other than the middle of a combo. Also, please note that the sleeping effect is dispelled if a sleeping opponent is hit by a red note after falling sleep, as in all other sleeping-inducing moves. The notes disappear if the hit a solid object, like items or solid platforms.

Side ~ Shooting Star
When using this move, Peter is surrounded by a momentary flash of light (no doubt provided by Tink) and then shoots forward, spinning in a corkscrew like motion while glowing golden. The total distance traveled is about equal to half of Battlefield. While he flies forward, Peter lets loose a giddy laugh as he spins into opponents with his magically-amplified body. Of course, after the move is finished, he is left rather dizzy and takes a moment to regain his balance. The move scores multiple quick hits, causing about 10% damage total if all the hits connect. At the end, it sends opponents flying backward.

Although this move is one of Peter’s few KO options, it is also probably his most risky. The ending lag makes it easily punishable, and the fact that it cannot be curved makes it a horrible recovery choice—not to mention the fact that it puts Peter in helpless animation if he uses in while flying. Timing is essential with this move!

Down ~ Eye of the Storm
Peter’s main method of avoiding attacks, taken from his attack as a party member in Kingdom Hearts. Peter is instantly surrounded by a swirling wind vortex for 3 seconds, which goes up slightly above his head and below him (if hovering, this move will reach the ground). When an opponent touches this barrier, they are struck for 2% damage and no knockback or hitstun (allowing opponents to get away easily)… Seems like a rather poor way of racking up damage, don’t you think?

That’s because damaging isn’t this move’s purpose: reflection is. Any and all projectiles, regardless of size or state of matter, are deflected and sent flying back in the direction they came in with damage and speed increased by 50%. Since Peter can move while shielded, it may seem impenetrable. However, once this move’s duration is used up (once again, that’s 3 seconds), it can’t be used for 5 more seconds. Don’t use this move too recklessly.

~~~ A MAGICAL OFFENSIVE…

A ~ Sprightly Stab
Peter stabs forward with his dagger. The reach is terrible, and the damage is a measly 1%. Don’t try this as a single attack unless you’re just trying to interrupt opponents’ attacks, as this strike comes out very fast.

AA ~ Cross Slash
Peter’s follow-up attack, he speedily slashes across the opponent with his dagger. If you’ve already gone to the second stage of his attack, might as well keep going, right? This attack deals slightly more damage at 2%.

AAA ~ Journey’s End
The final stage in his three-part attack, Peter sweeps his knife upward, knocking opponents up into the air slightly and causing 3% damage. Even though this combo doesn’t do much damage, it’s amazingly fast and a solid interrupting attack.

Held A ~ Hummingbird
If you hold the A Button as though you were releasing an infinite jab, Peter lets loose his trademark crow and flies forward, darting near his opponents and raining countless blows upon them. All the hits of this attack land—it’s impossible for an opponent to get out of it. The total damage caused is about 8%, but it doesn’t cause good knockback. This makes this a rather situational attack, as Peter is usually left right in the opponent’s face. Unless you dodge fast enough, Peter’s probably going to get it. Nevertheless, the attack is quick and an all-around solid move.

Forward — Dizzy Slicer
Peter rears back and swings his dagger horizontally, twirling around once before stopping in the same position he was before. The range is just as short as usual, and the starting lag is actually rather slow for Peter’s standards. It’s also rather weak, dealing a measly 5% damage.

However, the main purpose of this move is its ending effect; if the opponent is hit by the knife, they are dragged along in the same pattern as Peter, spinning around, although they spin around several more times than you do. Therefore, it’s well worth it if this move connects; by the time you’ve recovered from the spin, you’ll have more than enough time to strike your opponents with a well-timed smash attack. When used in the air, the same effects still occur; Peter and the target simply freeze while the animations take place.

Up — Dust Bomb
Yay, pixie dust! Unfortunately, your opponent won’t have time for happy thoughts after you use this move. Peter makes an upward tossing motion with his hands, tossing up a handful of pixie dust that travels up and then begins to float down. However, this is special pixie dust Tink has specially prepared for Smash. If an opponent comes near this dust, it wraps around the opponent quickly, flying into their body and exploding, stunning them for approximately one second and dealing about 7% damage. This is especially useful to use in the air, as the dust does not disappear until it hits the ground.

This move cannot be spammed; if Peter uses it more than three times, it takes approximately ten seconds before he can use it again. Still, the idea of showering the opponent with explosive pixie dust is quite appealing, isn’t it?

Down — Croc Clock
An alarm clock is drawn into young Peter’s hands as he throws it to the ground—the same alarm clock that was swallowed by the infamous crocodile who follows Captain Hook. The clock remains stationary for three seconds, making the ominous ticking noise that announce the croc’s arrival. After three seconds, it suddenly explodes, dealing 12% and good knockback. If the clock wasn’t so slow and predictable, it would be a much more viable KO option. The clock can be picked up and thrown like any item; if it hits someone, it causes 3% and low knockback. In the air, this can be dropped down on grounded foes for a chance at potential aerial assaults.

~~~ MAGICAL SMASHES…

Forward ~ Swashbuckler
This is Peter’s only move in which he doesn’t use his dagger; instead, he draws a thin pirate sword, which is a bit longer than Toon Link’s sword. When this smash attack is released, Peter swings the sword diagonally across his body with a flick of his wrist, and then horizontally across with the same quick movement. The second strike is the only on that deals knockback, allowing opponents to be hit by each swing.

This has much better reach than the rest of Peter’s attacks, although if the first blow is dodged (which still isn’t difficult to do) Peter can easily be punished. This move deals 12% in total and gives good knockback making it possibly his most viable killing option. Also of note is the fact that this attack possesses the only disjointed hitbox in Peter Pan’s arsenal.

Up ~ Starlight
If he’s currently grounded, Peter will hop slightly off the ground to use this. As soon as the smash attack is released, Peter spreads his arms and legs out wide, a glowing yellow star appearing above him and bathing the young boy in an angelic glow. The main area of effect is the star itself, which is about the size of a Pokéball and deals 14% with good knockback. However, the rest of Peter’s body is its own hitbox, dealing 6% with low knockback.

Despite this attack’s high damage, it’s rather slow compared to the rest of Peter’s moves; however, it’s a good way to keep enemies off of you. However, its low speed makes it usefulness situational. Obviously it’s good for dealing with enemies above you—but with Peter’s aerial abilities, this shouldn’t happen often. The hitbox of the star is larger than its size would imply, though, so perhaps you can find other uses for it?

Down ~ Corkscrew
Peter flips upside down, facing the ground. As his body straightens out, he holds his dagger out and spins around several times. This attack only deals one hit, but it’s a pretty powerful one, striking for 10% damage and giving sideways knockback. While spinning, Peter does not fall. The longer this attack is charged, the longer Peter spins and the more knockback this attack gives.

~~~ MAGICAL GRAB…

Grab ~ Sky Launcher
Tink flies out and pushes the opponent towards Peter, who grabs them and holds them close. Slightly above average reach and no damage. This cannot be used if hovering or flying; but that’s okay, considering his throw isn’t exactly stellar. Pressing A during this move will make Peter swipe a dagger at his foe, dealing 1% damage. This move comes out very fast, allowing players to spam it if they so choose.

Throw ~ Flying Launcher
Peter speedily flies into the air with his foe, using his momentum to swing the opponent in the direction of choice and send them spiraling through the air; this causes a measly 5% damage. After this throw ends, Peter is in Flying Mode, which shows this move’s true purpose—not as a damage dealer or KO move, but a combo starter! After all, if the opponent doesn’t have enough time to recover and Peter starts flying as soon as the throw is completed, chances are you’ll be able to quickly apprehend your opponent and hit them with a well-time Smash! Fly, Peter, fly!

~~~ MAGICAL MAGIC METER…

MAGIC BLITZ ATTACK ~ FAITH, TRUST, PIXIE DUST

Tinkerbell begins pouring pixie dust upon Peter, increasing his flying ability even beyond that of his normal capacity as he gains a golden hue. Using this, Peter immediately flies offscreen at Sonic’s dash speed before flying back in at various points: Kat and Ana style. He makes 8 slashes across the screen aimed at opponents, all done while traveling across it at Sonic’s dash. Each slash deals 15% damage and high knockback, though can be spotdodged easily because Peter has no way of predicting/countering it. This will, however, most likely, hit something at least…

MAGIC BLAST ATTACK ~ SECOND STAR TO THE RIGHT

Peter flashes with golden light and flies into the air (if you’re already in the air when he activates this, then he freezes where he is). Lifting Tink up by her wings, Peter begins to shake the fairy, sending copious amounts of pixie dust raining all down over the field. Once an opponent touches this pixie dust, the true move begins; Peter slowly flies a distance roughly equal to the length of Battlefield before he Tink runs out of pixie dust. If the dust does not come into contact with anyone else, well…you’ve just wasted this. Way to go.

However, if some dust manages to land on an opponent, they have no way of escaping. The rest of the Final Smash is cinematic: Peter flies down to the opponents and says, “C’mon, just think happy thoughts!” as he grabs the targets’ hands and pulls them into the air (if there is a third opponent, then they hold onto the feet of another fighter). Peter lets them go as they float, clumped together, and he flies below them. Pointing to a nonspecific point in the sky, he says: “You take the second star to the right…”

After he says this, Peter rushes upward with blinding speed, slashing so quickly with his dagger it can only be seen as a blur. He makes multiple quick strikes, dealing 25% damage to his opponents. Peter finally rears back for a final attack before slamming his glowing knife into the opponents, sending them flying high into the sky with 5% more damage. As he delivers this blow, he says “And straight on ‘till morning!” While the opponents soar off the screen, Peter puts his hands on his hips proudly; Tink then flies in and quickly heals Peter for 15%.

The hardest part of this is connecting with the initial blow. The falling pixie retains the same slow, infinite properties as Peter’s Up Tilt—that is, the dust won’t disappear until it hits the opponent or another solid object. The closer you are to your opponent before activating the attack, the better chance you have of succeeding.

***

~~~ MAGICAL STYLE…
Peter Pan’s main advantage in battle is his awesome aerial game. Despite the fact that he has no aerials, he makes up for this by being able to use ALL of his other attacks in the air—even his Smashes! Therefore, approaching isn’t as much of an issue for Peter as it is for other characters. It’s rather simple to just fly into the air and descend upon your opponent with a corkscrew attack.

Of course, that doesn’t mean you can KO opponents that easily. Peter has an exceedingly difficult time killing his opponents due to the low damage most of his attacks give. Only a few of his moves have good knockback—his Forward and Up smashes come to mind, but the latter takes skill to land correctly. With Peter you need to be able to quickly rack up damage and pull off a smash before your opponent can realize what you’ve done.

Peter has no trouble comboing attacks. Start with a Throw and then follow up with a Dust Bomb; chances are you’ll be close enough for the dust to explode before it begins falling down. You can then take advantage of their stunned state to sweetspot Starlight. Boom, your opponent’s flying helplessly and you can probably follow up with almost any attack you’d like. Attacks like Hummingbird are great to use in the air due to their high priority, and his neutral poke is a great way of interrupting opponent attacks.

Peter’s also got a good amount of spacing moves—that is, attacks that keep him away from harm. Eye of the Storm is a solid projectile reflector, and some moves like Wayward Fairy are great for keeping opponents away from you. Don’t hesitate to use these attacks if you need to keep your opponents away; after all, that’s what they’re for. Not only that, but they allow Peter to be a useful hit-and-run character, if you are so inclined to play him that way.

You should really only play on the ground when you are forced too; being in the air generally is safer, even if you’re fighting against another aerial fighter; not even they come close to matching Peter in the sky. With that kind of mobility, you should be in the air all the time, especially for things such as edgeguarding and gimping—Peter’s quite excellent at that, as you could guess (that is, unless you are attacked by a recovery move).

The only thing you might want to be on the ground for is using hover mode – usually a good thing to be in, as it allows you to quickly switch between ground and sky.

Evasion is also a key point with Peter—well, it’s important for every character, but when you’re dealing with a lightweight and floaty target with above-average height, you need to be able to dodge at a moment’s notice. Luckily, Peter’s dodges are quick and take him back a long distance; he’s quite the speedster, after all. Even seemingly trivial things like his aerial flips make him that much quicker and harder to hit.

So, in conclusion, playing Peter Pan requires that you not get overly-excited with his aerial prowess. Making quick strikes and keeping opponents from hitting you are key areas of his playstyle. It’s also essential you learn when to descend to the ground for combo opportunities, and take to the skies when danger is imminent. He has two main styles: the high-risk, high-reward combo maker and a quick and flighty hit-and-runner…you must master them both to succeed.

***

~~~ A MAGICAL PERSONALITY…

Up Taunt
Peter cups his hands around his mouth and crows loudly.

Forward Taunt
Peter takes a handful of pixie dust and tosses it forward with a flourish. This pixie dust does nothing; it is merely a visual effect.

Down Taunt
Peter proudly puts his hands on his hips and declares loudly, “Ah, the cleverness of me!”

Victory Pose 1
Peter spins wildly while yelling, “Woo-hoo!” He floats up into the air while pixie dust flies off of him in showers. He finally stops and looks to the screen with a smile on his face and laughs before announcing, “That was fun!”

Victory Pose 2
Peter thoughtfully rests his hands on his fists and wonders, “Wow, you’re terrible. Maybe if you think happier thoughts, you could beat me!” He pauses, and then cruelly says, “Nah!”

Victory Pose 3
Tink flies out from behind Peter and whispers something in his ear. Peter laughs at it and looks at the screen, as if talking to his opponent: “Tink says you’re not worth our time.” He then shrugs and says, “I think she’s right.”

Victory Pose Vs. Captain Hook
Pan chuckles to himself. “Try again next time, codfish!”

Victory Pose Vs. Dumbo
Peter Pan turns to the flying elephant, hands on his hips. “You’re good, little guy…but not as good as me!”

Losing Pose
Peter sits Indian-style on the ground, angrily looking at the ground and refusing to clap. Tink flies around his head, making annoyed, high-pitched ringing sounds constantly.

Shield
Tinker Bell flies in front of Peter to project a bright yellow pixie dust shield for him.

~~~ A MAGICAL REPUTATION…

HADES/ Ever consider a change of wardrobe, kid? I mean, the whole tights thing doesn’t suit you. I mean, I ain’t no fashionista but I’m just saying…

~~~ A MAGICAL TALE…

Symbol
A feather, identical to the one that is placed in Peter Pan’s hat.

Entrance
Peter flies in from the background and lands on his feet, ready for battle. Tinker Bell follows close behind, ready to follow and aid him.

Selection Sound
“It’s off to Neverland!”

Music
You Can Fly, one of the cheeriest songs from the Peter Pan soundtrack.

***

“Now, think of the happiest things. It’s the same as having wings.”

Posted by: Davidreamcatcha | February 26, 2013

Engine – HUD

HUD

The game uses a visual HUD to show its various variables. There is a sketch-paper frame bordering a square picture portrait of the character. Below the portrait is the character’s name. In team matches, the paper frame is lightly hue’d in the player’s team color. In free-for-all matches, it is hue’d based on the player profile’s favourite color (or a darker shade, if another player has that hue already)

When accumulating Magic Meter, the paper frame gradually fills with color, from bottom to top (like ink filling a jar), slowly coloring the frame with a picture that represents the character being played (e.g. Maleficent would have a thorny frame background). Even when filling with color, the frame maintains its chosen hue (so a red team Maleficent would have red thorns). Once filled to the brim, the entire frame glows, indicating that MBlitz and MBlast can be used. During MBlitz and MBlast (i.e. when you use the meter), the frame drains of color, at a speed that matches the length of the chosen super attack. Once the frame is empty again, the MBlitz/MBlast has ended.

Damage is accumulated in the same way Smash Bros handles damage. However, there is no number or bar to show this. Instead, a picture portrait of the character on the HUD, becomes tattered and worn with the rising damage. The portrait itself also changes to become more glum, and its background becomes more red in hue. When a player is struck, the portrait winces and shudders briefly.


Once the player has suffered so much damage that their character can be KO’d easily, their portrait suddenly and audibly tears in several places, with little pieces of paper scattering out from it like confetti. The HUD then becomes static, with no further alterations based on damage (even though the player can still accumulate more damage)

A full visual reference, containing other things not mentioned in this summary, can be found here.

Posted by: Davidreamcatcha | February 22, 2013

Pride Rock

PRIDE ROCK

priderock

The majestic home to the lions and lionesses, named ‘pride’ after the term for a group of lions. This is all but mandatory for a Lion King stage.

Here, you fight on the standard sloped point of rock that is shown regularly in the movies. This area is about the size of Bridge of Eldin. However, it is slanted downwards, the cliff point of the rock being on the left side, while the rest of the rock slants down to the right. The cliff point to the left serves as an edge, where characters can be KOed off the bottom boundary. On the right edge of the screen, where the rock slants down, there is a walk-off edge. However, the side boundary is thankfully not too close, to prevent easy, cheap KOs. The only other stage elements here are a weather change. Occasionally (about every minute and a half), a heavy rain will commence. However, unlike on Distant Planet, it will not wash away characters, but merely increase the likelihood of slipping for its duration (10 seconds). Other times, instead of rain, the African sun will rise high overhead, dealing 1% of knockbackless damage to grounded characters every 3 seconds, lasting for 20 seconds. In the background, there are all sorts of African wildlife and foliage, adding to the wild effect of the stage.

Circle of Life
King of Pride Rock
This Land
I Just Can’t Wait to be King
Can You Feel the Love Tonight

Posted by: Davidreamcatcha | February 22, 2013

Engine – Disney Dubloons

DISNEY DUBLOONS

109107204

Playing the various modes in-game, automatically gains Disney Dubloons, the game’s own currency for purchasing certain extras. A Disney Dubloon has the familiar Mickey Mouse head shape, and they come in Bronze (1), Silver (5) and Gold (25) flavours. However, whilst they are accumulated simply through play, they are not yet part of the player’s coffers. To make the Dubloons yours, the player must play the Mystery Box Mode. When the player has at least 100 dubloons to claim, a selectable Mystery Box appears on both the main single player menu, and the character select screen for multiplayer matches.
The single player variant sees the player to a flat, money themed stage, with a large ? box hovering in midair in the center. After a brief countdown, the box begins fountaining Disney Dubloons from its open top, raining the cash down onto the stage. The Dubloons do not stay for long, bouncing only thrice before vanishing. Every Dubloon the player manages to collect, goes directly to the wallet of the character the player is playing as.
The multiplayer version plays in primarily the same way. There are more players to collect the falling coinage, but those dubloons will be going to other characters’ wallets too. You can also knock dubloons out of the other players by attacking them, then collect those dubloons for yourself. If you play the multiplayer version with AI characters, the dubloons the AI collects do not count, but the dubloons the player gets are multiplied by [1+(CPU/Players)].

While this is the main way Dubloons are gained, they also appear in smaller numbers during single player modes as collectables, where they can be directly collected and added to the character’s wallet, without the minigame. Similarly, some item containers in multiplayer may contain Dubloons to collect.

Now, regarding the extras that may be purchased with Disney Dubloons. In the game’s “Shop” menu, you can select which character will enter the shop. The money you can spend there is obviously dependent on the money that character has in their wallet. You can buy various additional extras for that character, such as new costumes and stage music. You can also opt to spend the dubloons on things that aren’t character specific, such as new stages or new assist characters. By default, only things the character can purchase will appear in the shop. You can toggle the “all items” option to see all the purchaseable things the shop has. However, if you choose to buy a character specific purchase with the wrong character, it costs twice as many Dubloons.

As you can see, this is a fairly complex process compared to “get coins, spend coins”. The idea is to encourage playing as other characters, encourage little minigame breaks between multiplayer matches, give Disney Rumble some legs in terms of unlocking stuff over time, and make the actual collecting of the money more engaging in itself.

Posted by: Davidreamcatcha | February 21, 2013

Scene 20 – Cowardly Snake

COWARDLY SNAKE

“A snake, am I? Perhaps I’ll show you how sssnnakelike I can be!”

Player: Aladdin

Opponent: Jafar

Stage: Cave of Wonders

Stocks: 2 Stock

Reward: Unlocking Jafar

This is a rather simple event, to an extent…you fight in a stock match against Jafar, with magic meters and all the hazards onstage disabled. However, there’s a catch: as soon as Jafar loses his single stock, he floats back onstage with uses his Magic Blitz attack (with you unable to summon the Genie during this time). He only summons 2 guards during the first part, but the genie part lasts indefinitely! Once you throw the lamp offstage, you win this scene!

Posted by: Davidreamcatcha | February 20, 2013

Game Mode – Scenes

SCENES

$(KGrHqZ,!pQFCpIuroNBBQqZlTLrtw~~60_35

Scenes are single player tasks seen in Disney Rumble – akin to Smash Bros’ Event Matches. These are 1 player challenges in which you take on unique challenges, representing scenes from iconic Disney films or placing characters into unique scenarios! Can you complete them all?

Posted by: Davidreamcatcha | February 20, 2013

Mechanic – Sketchy

SKETCHY

Ariel-Sketches-walt-disney-characters-19989343-809-872
Sketchy is a status affliction that is primarily inflicted by certain items, such as the Eraser (attacked player becomes sketchy) or the Sketchy Artist (summons an assist character that is sketchy, instead of the normal versions summoned by the Assist Artist).
Visually, sketchiness renders the character as a sketched outline, filled with a flat white color, the same way they are rendered during the opening of the match.
A character who is sketchy loses the ability to have their attacks clank against others (so now their attacks lose to attacks of equal priority) and suffers a light penalty to damage and knockback. While they can still block just fine, their block loses the ability to stop foes from walking/rolling past them. Assist characters that are sketchy, have a flat reduction in effectiveness, no matter what it is they do.

« Newer Posts - Older Posts »

Categories